hey dolls
hari tu berjalan2 dekat ecurve punye bazar, then ada one booth jual wall sticker.... murah jugak la... 34 ringgit je.. so memang nak beli sebab atas kepala katil tu kosong....
so ini lah hasilnya.......
ok la kan berbaloi dengan harga
Showing posts with label DIY. Show all posts
Wednesday, May 15, 2013
Sunday, May 12, 2013
WEDDING RUBBER STAMP DIY
hey dolls
nie contoh rubber stamp yang i design for my wedding. For the rubber stamp, i dah design before kitorang nak pergi tempah dekat kedai buku gombak tu je.
bagi je format jpg kat kedai ambik masa 3 hari nak siap......Oh, ramai yang tanya kenapa aku buat rubber stamp. saje..... sebab semuaorg pun buat... hahahahaha boleh tak????
rubber stamp ni still boleh pakai lepas kahwin nanti untuk kad raya ke apa. So, takdelah membazir kan. konon macam hantar kad raya... padahal nan hado... puiiii....
Hehehe...i am a Quantity Surveyor. =P
Labels:
DIY,
wedding,
wedding preparation,
Wedding Tips
Saturday, May 11, 2013
GUEST BOOK DIY
hi dolls
Atas permintaan ramai untuk template postcard untuk guest note tu.
Kununnya tetamu wish atas postcard & masuk dalam peti surat.
Sorry ye i dah takde template tu sebab letak dalam computer opis..
Tapi i boleh buat tutorial secara ringkas untuk bagi idea.
Nanti korang edit la size ke gambar ke ikut suka.
Apa yang korang perlu ada?
1) Paint - Semua computer ada kot
2) Photoscape - Download free & cepat
3) Internet - Confirm ada kalau korang tengah baca blog kina.
Hahaha.
Senang je sebenarnya, sebab main edit-edit je.
Tapi korang mesti simpan semua dalam 1 folder kat desktop.
Supaya korang tak serabut kepala bila nak masukkan photo.
Kita layan ikut gambar senang sikit faham kot.
Klik kat gambar untuk lebih jelas ok, maklum la blog size kecik.
1) Buat 1 canvas kosong dari Paint, just tarik bucu bagi besar sikit.
Actually kalau buat border pakai paint terus pun boleh.
2) Save as jadi gambar letak dalam 1 folder kat desktop utk mudah cari nanti.
Save la gambar tu atas nama 'postcard'
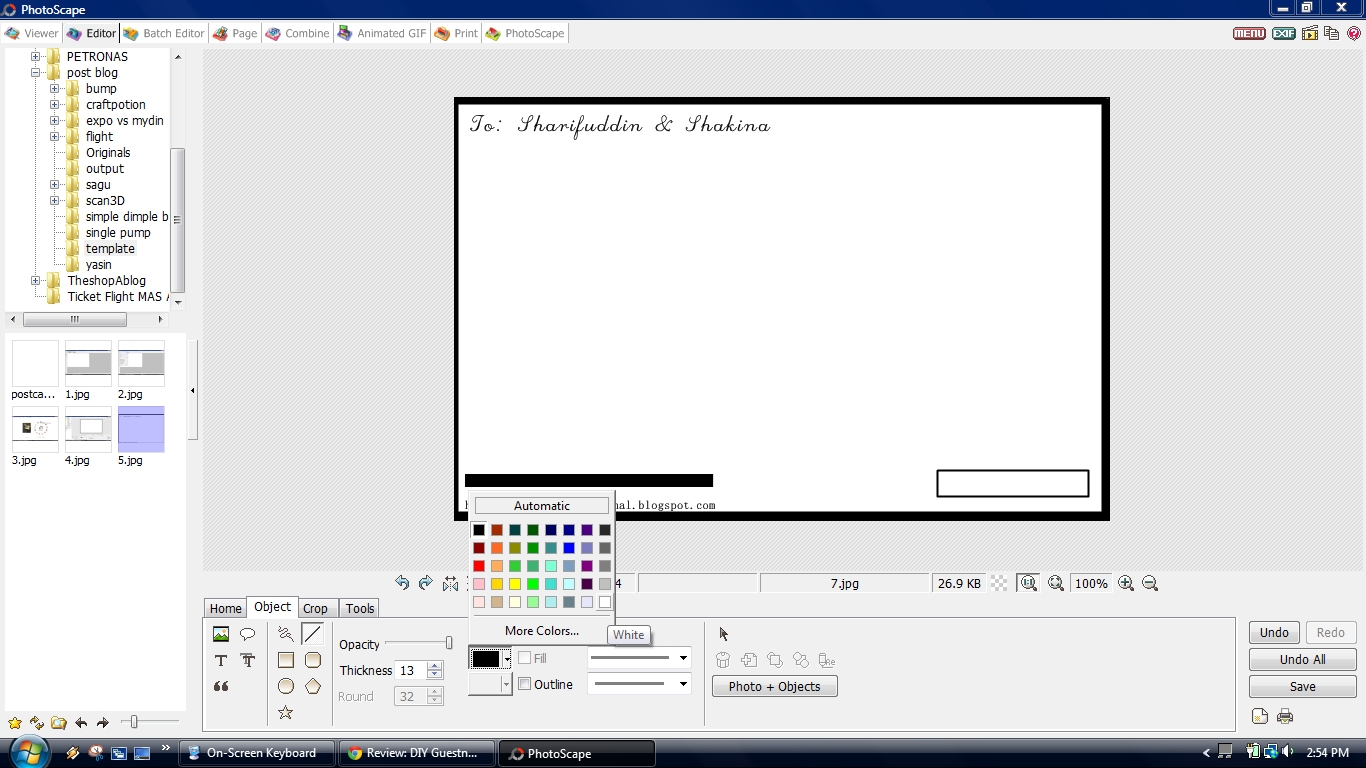
3) Open photoscape, klik la Editor macam yang dibulatkan merah di atas.
4) Belah kiri akan ada senarai folder. Cari 'postcard' dari folder template.
Boleh terus edit, klik la box kat bawah tu buat la border hitam.
Boleh ikut thickness border tu berapa, macam kina thickness 6.
5) Click Huruf T untuk masukkan tulisan ke dalam postcard.
''To: ????''
Boleh edit font, sizem italic semua kat box tu.
6) Buat box untuk poskod konon-kononnya.
Dulu kina buat box kecik2 untuk letak date wedding.
Trick untuk buat bar code tu plak. Buat Line dengan klik /.
Line color hitam, thickness tebal. Untuk buat line putih bar code.
Korang tukar je warna & thickness kecik lukis la atas line hitam tu.
Jadi la bar code! Simple je.
7) Nak masukkan stamp ke dalam postcard tadi.
Ni cara singkat la. Lagi baik kalau korang buat sendiri.
Korang save dari google images letak dalam folder
template tadi gak.
8) Klik dekat photo, cari gambar setem yang korang dah edit.
Kalau nak ajar cara edit setem panjang jadinya tutorial ni.
Jadi, edit dulu setem baru masukkan ke dalam postcard ok.
InsyaAllah, korang mesti dah tau cara based on tutorial ni.
Maka..Hasilnya jadi la macam ni..hihi..
Korang paste je dalam word pastu print je..
Dulu kina print 6 keping dalam 1 page A4.
Mudah kan?
Selamat mencobaaaa!
Korang buat mesti lagi cun punya.
Happy weekend everyone!
Labels:
DIY,
wedding,
wedding preparation,
Wedding Tips
Friday, May 10, 2013
BUTTON BADGE D.I.Y
Hey dolls
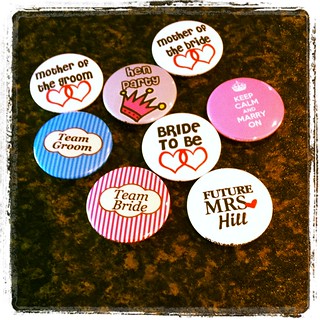
button badge nie design sendiri. sebab malas nak tempah, kalo tempah kena tempah banyak.. ni pun berlebih2....
so i bagi cara2 nak buat sendiri ye...
Rata2 harga button badge, ada yang sampai RM4 per different design

button badge nie design sendiri. sebab malas nak tempah, kalo tempah kena tempah banyak.. ni pun berlebih2....
so i bagi cara2 nak buat sendiri ye...
Rata2 harga button badge, ada yang sampai RM4 per different design
So, apa kata. Kita design sendiri button badge kita
Design yg lain2 pon boleh, macam ni.
atau design yang sama je semua macam ni
Sesiapa yang rajin nanti boleh la try design button badge anda
sendiri dengan menggunakan
Adobe Photoshop
Kat sini, i ada share template
U'ols boleh download,
open kat Adobe photoshop.
Dan boleh terus start design
Saiz kat button badge, cik bie bagi yang standard saiz
58 mm ( 2.25 inch )
terpulang pada kretiviti anda untuk mendesign
button badge anda sendiri. Lepas tu,
boleh la pergi hantar print dan jadikan badge
maka, lihat sendiri hasilnya.
u'ols akan dapat template macam ni nanti
Ok! Lepas tu ah boleh print. Lihat Outcome dibawah
.
Tarra.!
Button badge diatas dibuat secara manual, menggunakan tangan
untuk mengelepetkannya,
(kelepet? hmm.. apa bahasa sesuai nak guna untuk memaksudkan lipat ke belakang ni?
Hahaha.. layankan jelah ye.. hahaha..
aktiviti kelepet ini, tidak menggunakan bantuan
mesin sama sekali.
Nota KakiTangan :
Tengah fikir... nak DIY Sendiri ke button badge ni guna tangan?
Gigihnya.. ada masa ke nak kelepet benda ni banyak2?
Haih.. Bergantung pada keadaan kot.!
Tunggu dan lihat je ye..
Sesiapa yang gigih. Sila lah DIY benda ni sendiri
sangat menjimatkan.
Pakai kertas A4 biasa je.
Print - gunting, kelepet ke dalam badge
yang dah semulajadi ada ni.
Tutup dengan penutup pin bahagian belakang dia tu
nak bagi kuat, letak je gam tembak or gam UHU.
Hah! Siap dah..
Selamat mencuba resepi saya ni.
hehe.. love u'ols.
muah!
Labels:
DIY,
wedding,
wedding preparation,
Wedding Tips
Wednesday, April 3, 2013
Stiker wedding
Hi dolls
haah ambik kow, dah preggy 4 months baru nak update hal wedding nie... hehehehe. tak pe la... janji update kan.
Nie adalah hasil stiker yg telah i design... Wah feeling artistic sangat... Murah je stiker nie.... Rm200 untuk 500 keping sticker... Nie pun dia ada bg lebih.... Heheheheh... Me dapat idea design the stcker... Tapi design dlm paint je.. Budak tecik yg bagi idea untuk color..... Maka terhasil la... nie i dapat offer masa ppegi pameran pengantin ....
Sebelum finalize mintak pendapat, sha, mel n ika.... And semua agree design tu.....
Tapi sticker nie tak semua org dpt... First come first serve basis yek.... Huhuhu cewah...
haah ambik kow, dah preggy 4 months baru nak update hal wedding nie... hehehehe. tak pe la... janji update kan.
Nie adalah hasil stiker yg telah i design... Wah feeling artistic sangat... Murah je stiker nie.... Rm200 untuk 500 keping sticker... Nie pun dia ada bg lebih.... Heheheheh... Me dapat idea design the stcker... Tapi design dlm paint je.. Budak tecik yg bagi idea untuk color..... Maka terhasil la... nie i dapat offer masa ppegi pameran pengantin ....
Sebelum finalize mintak pendapat, sha, mel n ika.... And semua agree design tu.....
Tapi sticker nie tak semua org dpt... First come first serve basis yek.... Huhuhu cewah...
Friday, November 23, 2012
DIY Delight: Very Versatile Veils
The verdict is out on veils, and that is that anything goes!
Now, I don’t know about you, but I remember during the initial wedding research phase, I was pretty taken aback at how much veils cost for what they are (essentially, a bit of fabric worn in your hair – often, not for a very long period at all – many brides ditch the veil after the ceremony, or forgo wearing one completely, opting for fascinators, jewelled headbands or fresh flowers).
But if you have your heart set on wearing one, it doesn’t have to cost you the earth and it doesn’t have to be intricate or complicated – in fact, it’s quite easily made in the comfort of your own home, regardless of your DIY capabilities! All you need to do is decide on what length you’d like your veil to be (refer to the cute illustration above for a guide) and think about how it will go with your dress, and what materials you’d like to use. Lace? Lovely. Tulle? Terrific! Brooches? Beautiful!
Here, we bring you some of our favourite DIY veil tutorials. Let’s start with something short and easy:
For those of you who like things exact (in other words, not me – I do everything from cooking to my sometimes disastrous DIY projects by feel), this tutorial by Lauren from the House of Lovely is the perfect way to get you started with a simple birdcage veil you can leave as is, or dress up with adornments of your choice.
With heaps of pictures and nifty little tips, it’s a great kickstart to unveiling the mystery of DIY veils.
This style of veil is vintage inspired and so easy to feature heirloom items like a brooch, a pendant or a pair of earrings – that could be your ‘something old’ or ‘something borrowed’ sorted right there.
Having the tendency to do things intuitively, I love how you can mix, match and really push the envelope on this veil – perfect for the non-traditional bride! Best of all, because you’re using relatively small quantities of the materials, you can experiment and make several veils before deciding on the style that suits you best.
What to do with the leftover/s? Wear it out on your hen’s night – that way, a perfectly good veil hasn’t gone to waste, and you won’t have to wear a tacky affair with blinking LED lights!
“A mantilla veil, what’s that?” you ask. It’s a traditionally Spanish style of veil, worn to church by the ladies. While its original use may have petered out in modern times, being so lightweight (you can even make it out of silk – how’s that for an idea?) it is perfect for warmer climates, and you won’t need someone to hold your veil for you while you visit the little girls’ room!
The Offbeat Bride used thin lace for the edging and pearls to decorate her mantilla veil, but we reckon it would also look beautiful with broader lace, sequins or a ribbon of a different colour, to match your bridesmaids’ dresses, for instance.
If you’re besotted with the drama a cathedral-length veil brings (the older ones among us may be thinking of the late Princess Diana’s nearly seven-metre veil!), it isn’t something beyond the DIY realm.
Follow Rebecca’s clever tutorial (complete with illustrated diagrams!) to help you create your own cathedral-length confection. If you’re feeling extra ingenious, consider making the longer section of your veil detachable, so you can dance the night away without tripping over it!
If you’re all tutorial-ed out and still feeling a little certain, there’s always Etsy to the rescue, ladies! You can buy your own DIY veil kit there, and have the satisfaction of making your own veil, with the materials and instructions thrown in, to boot.
Happy veil-making, ladies!
Thursday, November 22, 2012
DIY: Bridal Emergency Kit
i should've posted this a while ago but never got the chance to, i made this a couple months ago for tmbrady 's Bridal Shower.
My Inspiration came from 100 Layer Cake's DIY Bridal Party Survival Kit (http://100layercake.com/blog/archives/520).
Here's my DIY Bridal Emergency Kit & Matching Handmade Card:
Each of the little baggies were a kit on their own, i had the Fresh Breath Kit, The Spotless Dress Kit, The Polished Nail Kit, Beautiful Skin Kit, Perfect Hair, First Aid Kit, and other goodies like, Just Married Flip Flops, a disposable camera, a pack of tissues, and straws so the girls don't mess up their lips. Here's a few close up pics
Kad akad nikah DIY
Hi dolls
Ok for those yang tak tahu lagi, me nikah gantung with budak tecik.... Nikah bulan dec and sanding bulan jan..... Ok la kan?
So malas nak tempah card untuk nikah, sebab tak plan nak ajak ramai org pun..... So DIY je la.... Nie pun guna publisher.....
Ok la kan jimat... Tak yah membazir........ Hehehhe simple n sweet...
Harap semuanya berjalan lancar nanti
Ok for those yang tak tahu lagi, me nikah gantung with budak tecik.... Nikah bulan dec and sanding bulan jan..... Ok la kan?
So malas nak tempah card untuk nikah, sebab tak plan nak ajak ramai org pun..... So DIY je la.... Nie pun guna publisher.....
Ok la kan jimat... Tak yah membazir........ Hehehhe simple n sweet...
Harap semuanya berjalan lancar nanti
Wednesday, November 21, 2012
Vintage Fashion Illustrations: DIY Place Card Dolls
I love the look of vintage fashion illustration and I’m super excited that I found a way to use it for a vintage wedding! These DIY place card dolls are a breeze to make!
I got the idea for making these vintage fashion illustration dolls when I saw Claudine Hellmuth’s Sitting Pretties. Instead of using her template, I found some vintage fashion illustrations online and printed them on on cardstock. I folded them like the Sitting Pretties and voila! I love how they turned out!
To make it even easier for you to make these DIY place cards dolls, I’ve uploaded a bunch of vintage fashion illustrations that you can print out.
Here’s the tutorial on the DIY place card dolls:
Go to the vintage fashion illustration images. Right click on the images and save them. If you need more, do a search vintage sewing patterns on Google Images or Flickr.
Print the images on card stock. Cut out the images using scissors and an Exacto knife.
After the doll is cut, fold at the waist and at the knees.
Print out your guest list. I used Tekton Pro Ext. as the font. Make sure that when you print them out there is enough white space between the names. I used scissors with scalloped edges to cut them out. Adhere the names to the vintage paper dolls. (I used a glue stick.)
Turn wine glasses upside down and set the DIY place card doll on the bottom of the glass. Let your guests ‘oooh’ and ‘aaah’ over their cool place cards!
DIY Wedding Challenge: Pocketfold Invitation using 8.5X11 paper
Hilary
Materials
- 8.5 x 11 paper (80 – 100 lb weight is best for the pocketfolds, 60 lb is nice for the inserts but you can go thinner) Each invite will use one (1) sheet for the pocket fold and two (2) sheets for the inserts.
- Ruler
- Tacky paper glue and/or glue stick
- Scissors
- Paper trimmer Not necessary, but a nice to have instead of using scissors for everything, to make clean straight cuts
- Paper scorer or bone folder Again, not necessary, but on thicker paper it helps keep the folds clean.
Extras
- Ribbon To close off the invitation in a classy way
- Corner puncher Make rounded corners on your invites
- Heat embossing tools and materials (A stamp that you would like to emboss, pigment ink, embossing powder and an embossing heat tool)
- Printer Instead of printing elsewhere, you can print from home with nice results
- Design Program for your computer To help design your inserts; choices include Photoshop, Paintshop Pro, Gimp, Paint.net.
- Embossing I used my Sizzix machine to emboss the paper (create a raised image, without using heat), which turns out lovely but it used a lot of extra paper and time.
I. Creating the Pocketfolds
Cut your paper as shown below (made to scale). Save your scraps, too, you will use them to make the second “edge” of the pocket.
Fold along the light dotted lines. Fold up the pocket and glue the edge. Take your spare edge, glue both sides, and use it on the other side of the pocket.
Cut your paper as shown below (made to scale). Save your scraps, too, you will use them to make the second “edge” of the pocket.
Fold along the light dotted lines. Fold up the pocket and glue the edge. Take your spare edge, glue both sides, and use it on the other side of the pocket.
II. Creating the Inserts
I used two types of inserts; for most of my guests, I sent invitations that only had three inserts in them and directed them to RSVP online. A few received invitations that had RSVP card and envelopes in them.
The following are the measurements I used. A simple rule of thumb is to make the inserts just a little smaller than the pocket – so I made them a little less than 4 inches wide and just under 6.5 in tall. From there, I “guestimated” the heights so they would look pretty even and made sure to place the copy below the edge of the next insert.
I cut these out individually with my paper trimmer and allowed for some fluctuation in widths and heights because it will never be perfect. I also printed the inserts with “cheat guides” on the edges to help me cut quicker and faster.
A) Without a mail-in RSVP card
The following are the measurements I used. A simple rule of thumb is to make the inserts just a little smaller than the pocket – so I made them a little less than 4 inches wide and just under 6.5 in tall. From there, I “guestimated” the heights so they would look pretty even and made sure to place the copy below the edge of the next insert.
I cut these out individually with my paper trimmer and allowed for some fluctuation in widths and heights because it will never be perfect. I also printed the inserts with “cheat guides” on the edges to help me cut quicker and faster.
A) Without a mail-in RSVP card
B) With a mail-in RSVP card
A tip for your RSVPs—the RSVP will need to be cut a little thinner so that it will fit in your envelope. These measurements are a guide, but you will need to cut even thinner than this to make them fit cleanly in the envelope. Use 4 BAR envelopes (3 5/8 x 5 1/8) for these.
After cutting your inserts, glue the main invitation piece in the middle of your pocketfold. I recommend a glue stick for the middle and light tacky paper glue around the edges for a secure look that's not bumpy from the glue.
III. Extras
Simple things like these can all add a nice elegant touch without going over budget.
- Making rounded corners
- Adding a ribbon around it, tying it off with a bow or a gold sticker or circle (for a flatter and cheaper alternative for postage reasons)
- Coloring the edges of the inserts with stamp ink
- Heat embossing and nice stamped image
- Creating a map on the back of your directions card
A quick guide to Heat Embossing: You need pigment ink--this is because pigment ink stamp pads are slow drying. There are many methods to embossing, but for a quick and easy heat emboss, use your stamp with the pigment ink and after it's stamped on the paper, cover the stamped image in an embossing powder. You can get a cheap little canister at Jo-Ann's for $3.99.
Dump off the excess embossing powder. Often you'll find bits of powder sticking to the paper. A nice water color paint brush (you know, the cheap kind) will help you get rid of that. Then you use an embossing heat tool and wait until it melts and gets shiny and run it all along the stamp so it all gets shiny and melted. I picked my heat tool up at Jo-Ann for about $20.
Once it starts, it goes pretty quick; don't hover over it too long once it's melted because you'll start to warp the paper!
Tip: I tried the glue pads instead of a pigment ink and found that I got a lot of excess embossing powder on the paper with it. Black pigment ink occasionally showed through my gold embossing powder. The best solution was to get a gold pigment ink pad and use the gold embossing powder. That way if the embossing powder didn't completely cover the image, you couldn't tell at all because the ink itself was gold too!
Dump off the excess embossing powder. Often you'll find bits of powder sticking to the paper. A nice water color paint brush (you know, the cheap kind) will help you get rid of that. Then you use an embossing heat tool and wait until it melts and gets shiny and run it all along the stamp so it all gets shiny and melted. I picked my heat tool up at Jo-Ann for about $20.
Once it starts, it goes pretty quick; don't hover over it too long once it's melted because you'll start to warp the paper!
Tip: I tried the glue pads instead of a pigment ink and found that I got a lot of excess embossing powder on the paper with it. Black pigment ink occasionally showed through my gold embossing powder. The best solution was to get a gold pigment ink pad and use the gold embossing powder. That way if the embossing powder didn't completely cover the image, you couldn't tell at all because the ink itself was gold too!
IV. Final Thoughts
Here is my finished product; however, I changed the bows to just wrapping the ribbon around the whole thing and closing it off with a gold circle. Little did I know that envelopes can be too thick for regular postage!
With 80 lb paper for the pocketfolds and 60 lb paper for the inserts, I was just under the one ounce limit for regular postage; the mail-in RSVP invitations did require extra postage, but choosing different paper can make a difference.
Subscribe to:
Posts (Atom)